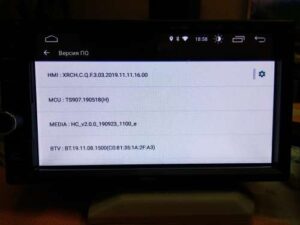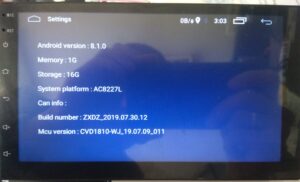

Head unit ZXDZ-01 AC8227L Based Processor Android 8.1
ZXDZ-01 Came with android version 8.1.0, AC8227 based processors developed by Chinese company Zhongxing Digital (ZXDZ). ZXDZ-01 head unit! Powered by the MT/AC8227L processor, this unit is packed with amazing features. Whether you’re rocking out to your favorite tunes or enjoying seamless connectivity, the ZXDZ-01 with HZ-MB-BB-8227L with AC8227L based Processor Details overview as under,
- HZ-MB-BB-8227L-PC78-512 x 4 x 4PCS-16bit-VER1.0)
- MCU CVD1810-WJ Plateform AC8227L
Specification
- 4 cores
- Android OS 8.1 (latest version), API version 27
- Built-in AV-Out (support all kinds of connection to headrest monitor)
- 4, Built-in 1G RAM and 16 ROM
- jythtrfBuilt-in 2 USB input, it can play music/movie/photo from local disk or connected TF card.
Software Features
- Operating system: Android 8.1 (not fake)
- Display size: 7 “, 9″, 10.1”
- Processor: Quad-core 1.2GHz
- Input power: 4 * 60W
- Built-in memory: 16
- Resolution: 1024 * 600
- Screen: Capacitive touch
- OBD: Support
- WiFi: Support. support online video, movie, music, radio, Youtube, Yahoo, MSN …
- USB For cards; Support
- GPS: support, download navigation APP makes your car become a GPS navigator
- OSD language: English, Russian, German, French, Italian, Spanish, Arabic, Hebrew, Japanese, Czech, Portuguese, Romanian, Turkish, Korean and other 46 languages. Etc.
Hardware Characteristics
- Android processor – AC/MT 8227L
- Bluetooth/GPS/WiFi/radio – MT6625
- MCU controller – STM32F030C8T6
- RAM – D25116EC4BXCCB (2 pieces)
- Power supply – MT6323LCA
Motherboard:


General Overview
- Manufacturer: Zhongxing Digital (ZXDZ)
- Processor Family: ZXDZ-01 series
- Model: 8227
- Architecture: The ZXDZ-01 series generally employs a RISC (Reduced Instruction Set Computer) architecture, designed for efficient processing and power management.
- 2A1.1.00HZ10090
- HZ-MB-BB 8227L-PC78 512×4 4Pcs-16Bit
Technical Specifications
Core Architecture:
- Design: Likely follows a RISC-based architecture, which focuses on a small set of instructions to achieve high performance.
- Performance: Provides a balance between computational power and energy efficiency.
Clock Speed:
- Frequency: The specific clock speed of the 8227 variant would need to be referenced from technical datasheets or product specifications. However, RISC processors like those in the ZXDZ-01 series typically operate at moderate clock speeds, optimized for performance per watt.
Core Count:
- Core number: Information about the core count of the ZXDZ-01 8227 is not standard, but processors in the same class usually have multi-core designs, which can range from dual-core to four-core configurations
Cache:
- L1/L2 Cache: The processor may include L1 and L2 caches to speed up data transfer. The size and shape of these packages were tailored to the needs of the processor, improving overall performance.
Thermal Design Power (TDP):
- Power consumption: Designed with energy efficiency in mind, the TDP will match its functional and operational requirement
Applications
- Consumer electronics: Suitable for use on consumer devices including tablets, smartphones and smart home devices.
- Industrial Applications: It can be used in embedded systems and industrial control systems due to its performance and reliability.
Compatibility
- Operating Systems: The processor is designed to work with operating systems that support RISC architectures. It may be compatible with specific versions of Linux or custom OSes tailored to the processor’s capabilities.
Performance
- It is optimized for applications that require a balance between performance and power efficiency.
- Performance benchmarks provide a clear picture of how the processor compares to similar models in this class.
Installing firmware on a ZXDZ-01 8227-based processor typically involves several steps. While specifics may vary depending on the specific configuration and firmware version, the following is a general guide to help you through the process. Always refer to the official documentation provided by the firmware manufacturer or vendor for specific instructions.
Stuck on Logo
If Headunit ZXDZ-01 stuck on the boot logo. It indicates the various factors arise from different types of issue may be its hardware can also from software.
Causes
Corrupted Firmware:
- Issue: During the firmware update process or a failed update can cause the device to get stuck on the boot logo.
- Solution: Try reinstall the firmware.
Incompatible Firmware:
- Issue: Using firmware that is not compatible with your specific hardware version can lead to boot issues.
- Solution: Verify that the firmware version is correct for your ZXDZ-01 8227 processor. Check for the right version and compatibility.
Hardware Issues:
- Issue: Faulty hardware components, such as memory (RAM), storage, or the processor itself can prevent the device from booting properly..
- Solution: Inspect hardware connections and components. If possible, test with different hardware components or perform hardware diagnostics if the device supports it.
Power Supply Problems:
- Issue: An unstable or insufficient power supply can cause boot problems.
- Solution: Ensure that the power supply is stable and provides adequate power. Check power connections and replace any faulty power sources if necessary.
Boot Loader Issues:
- Issue: Problems with the boot loader can prevent the device from progressing beyond the boot logo.
- Solution: Reinstall or repair the boot loader if the device supports such recovery options.
File System Errors:
- Issue: Corruption in the file system or boot files can cause the boot process to hang.
- Solution: If possible, connect the storage device to another system to check and repair file system errors.
Software Conflicts:
- Issue: Software conflicts or issues with startup applications might cause the boot process to halt.
- Solution: Boot into safe mode or use recovery options to troubleshoot and resolve software conflicts.
Troubleshooting Steps
Power Cycle:
Unplug the device wait a few minutes, then turn it back on and do a complete power cycle.
Firmware Recovery:
If the device supports firmware recovery or has a recovery mode, use it to reapply or repair the firmware.
Contact Support:
If the above steps do not resolve the issue, contact our technical support team.
Firmware Installation Guide
Preparation
- Identify the Firmware Version: Ensure that you have the correct firmware version for your ZXDZ-01 8227 processor. Firmware updates are specific to the hardware version and should be downloaded from a given link.
- Backup Existing Firmware: If possible, back up the current firmware and any critical data on the device. This step is crucial to avoid data loss in case something goes wrong during the installation. You must know the memory dump proceddure.
- Gather Required Tools: Depending on the installation method, you might need a USB drive for local update and MTK flash tool
Firmware Installation
- Firmware file both with USB and Flash tool upload under the blog you can download as per your requirement.
Prepare the Installation Environment
- Boot Device: Ensure that the device running the ZXDZ-01 8227 processor is powered off before beginning the installation.
- Access Method: Determine the installation method. This could be through a USB port, serial interface, or a dedicated firmware update interface. Refer to the device’s documentation for details.
Install Firmware
USB Method:
- Copy Firmware to USB: Place the firmware file on a formatted USB drive (usually FAT32).
- Connect USB Drive: Insert the USB drive into the appropriate USB port on the device.
- Goto Update Option: From Setting select local update
- Run Firmware Update: Use the device’s firmware update utility to select and apply the firmware file from the USB drive.
SPFT Installation Method:
Requirements:
- Firmware File: Download the correct firmware for your headunit model
- SP Flash Tool: Download and install SPflash tool into your computer
- VCOM Drivers: Install the VCOM USB drivers
- USB Cable: Use male to male USB cable to connect your head unit to the computer in 4Pin USB connector.
Firmwares Link:
Download the firmware on known path of computer where you can find file destination easily.
Install VCOM Drivers:
Download the VCOM USB drivers and install them. These drivers are necessary for the SP Flash Tool to recognize your device.
Download SP Flash Tool:
Download the SP Flash Tool from a reliable source and extract it to a known location on your computer.
Installation Process:
Launch SP Flash Tool
- Open the SP Flash Tool folder and run flash_tool.exe as an administrator.
Load Scatter File:
- Click on the “Choose” button in the SP Flash Tool next to the “Scatter-loading File” field.
- Navigate to the extracted firmware folder and select the MTXXXX_Android_scatter.txt file (where MTXXXX is the specific MediaTek chipset number, such as MT8227, etc.).
Prepare for Flashing:
- Ensure all the required files are loaded and selected in the SP Flash Tool.
- Make sure the “Download Only” option is selected and uncheck the preloaded.
Connect the Head Unit:
- Turnoff your headunit also disconnect from other power source. Connect headunit with the usb cable by using 4 pin connector.
Begin Flashing:
- Click the “Download” button in the SP Flash Tool.
- The SP Flash Tool will begin looking for your device. Once connected, the flashing process will start automatically.
Wait for Completion:
- Do not disconnect the device or interrupt the process until the flashing is complete. A green checkmark will appear indicating the process is successful.
Reboot the Head Unit:
- Disconnect the USB and then power on your headunit.
- Initially headunit take time then usual.
Complete Installation
- Verify Update: After installation, verify that the firmware has been updated successfully. This might involve checking version numbers through the device’s settings or running diagnostic tests.
- Reboot Device: Restart the device to ensure that the new firmware is loaded and functioning correctly.
- Restore Settings: If needed, reconfigure any settings that were reset or changed during the update process.
Post-Installation
- Test Functionality: Perform thorough testing to ensure that the device operates as expected with the new firmware. Check for any issues or lack of compatibility.
- Monitor Device: Keep an eye on the device for any unusual behavior that might indicate a problem with the firmware update.